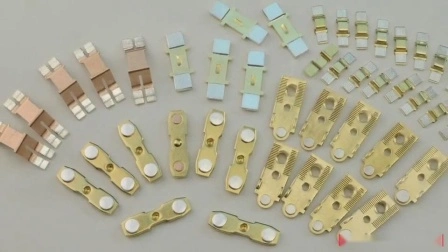
Electronic Product Testing Module Assembly
Electronic Product Testing Module Assembly ;
Basic Info
| Model NO. | Assembly module |
Product Description
| Item | Electronic Product Testing Module Assembly |
| Size | Customized, according to drawing |
| Technological Design | Process analysis and review of product drawings; Draw up a processing plan; Compile process specification and design and manufacture of process equipment |
| Material | Carbon steel, Stainless steel, Aluminum, Aluminum alloy, Copper alloy, Galvanized steel sheet, Magnesium alloy, Titanium alloy, Engineering Plastics, Rolled steel, Steel, Corrosion resistant aluminum, Special materials... Or Customized |
| Tolerance | +/-0.002mm, 100% QC quality inspection before delivery, can provide quality inspection form testing equipment |
| Processing | Milling, Turning, Drilling, Planing, Fitter, Boring, Grinding, CNC machining, Broaching, Grinding and Honing, CNC punching, Laser cutting, CNC bending, Welding |
| Heat Treatment | Normalizing, Annealing, Tempered, Aging, Tempering, Quenching |
| Special Processing | EDM, Wire EDM, Electrochemical machining, Laser processing |
| Equipment Support | CNC Machining Center(DMG/MAZAK), CNC Turning Milling Compound Machining Center(DMG), CNC Lathe (STS/Feeler/MAZAK/TAKISAWA), High Speed NC WEDM tool(San Guan/Gao Cheng), Milling Machine(GENTIGER/Joint), Grinding Table(Jian De), Surface Grinding Machine(NAGASHIMA/Wang Pan); Welding Machine(Panasonic), Laser Marking Machine(Hans laser), Bending Machine(Amada), CNC Laser Pipe Cutting Machine(Bystronic), CNC Punching Machine(Amada), Automatic Laser Pipe Cutting Machine(Songu), Desktop Laser Welding Machine(NINE), etc. |
| Surface | Polishing, Sandblasting, Zinc plating, Tin plating, Nickel plating, Gold plating, Silver plating, Copper plating, Alloy plating and Spraying (Painting and powder spraying), Anodizing and electrophoresis, Wire drawing, Sandblasting, Baking varnish, Dusting, Electroplate, Anodic oxidation, Silk screen, Plastic impregnation, Imprint, etc. |
| Certification | ISO 9001:2015, ISO 13485:2016, ISO 14001:2015, AS 9100D, CWB |
| Testing Equipment | CMM (ZEISS/HEXAGON), Roundness Meter (ACCRETECH), Tensile Tester (AIGU), Profilometer (TOKYO), Altimeters (TRIMOS/TESA), Hardness Tester (HAIBAO), Microscope(EASSON), Marble Platform(XINLEI), Welding Seam Inspection Scale(CWB), Digital Display Push-pull Meter(Eidelberg), Laser Digital Level(DAYOU), Helium Mass Spectrometry Leak Detector(Leybold), etc. |
| Supply Ability | 100,000 CNC machining parts, 3,000 Sheet metal parts, 50 Module per Day |
| Quotation Against | 2D drawings (PDF, JPG, DWG), 3D drawings (STP, IGS) or sample |
| Payment Term | T/T, L/C, D/P, D/A |
| Lead Time | 15-20days |
| Origin | Dongguan, Guangdong, China |


| Outer Cylindrical Surface Machining Scheme | ||||
| No. | Processing Methods | Economical Accuracy (Indicated by Tolerance Class) | Surface Roughness ValueRa ( μm) | Scope of Application |
| 1 | Rough car | IT11-13 | 10~50 | Suitable for all metals other than hardened steel |
| 2 | Rough turning and half fine turning | IT8~10 | 2.5~6.3 | |
| 3 | Rough turning, half fine turning, one fine turning | IT7~8 | 0.8~1.6 | |
| 4 | Rough turning, half fine turning, fine turning, rolling (or polishing) | IT7~8 | 0.2~0.025 | |
| 5 | Rough turning, half fine turning, one grinding | IT7~8 | 0.4~0.8 | Mainly used for quenched steel, also can be used for unquenched steel, but not suitable for processing non-ferrous metals |
| 6 | Rough turning, half fine turning, one rough grinding onefine grinding | IT6~7 | 0.1~0.4 | |
| 7 | Rough turning, half fine turning, one rough grinding oneRefining-Superfinishing (or Wheel Superfinishing) | IT5 | 0.012~ 0.1(orRz0.1) | |
| 8 | Rough turning, half fine turning, one fine turning, one fine turning (golden steel car) | IT6~7 | 0.025~0.4 | Mainly used for non-ferrous metal processing with higher requirements |
| 9 | Rough turning, half fine turning, coarse grinding, fine grinding, and super fine grinding (or mirror grinding) | IT5 | 0.006~ 0.025(orRz0.05) | Extremely high-precision cylindrical machining |
| 10 | Rough turning, half fine turning, one rough grinding onefine-grinding | IT5 | 0.006~ 0.1(orRz 0.05) | |
| Plane Processing Scheme | ||||
| No. | Processing Methods | Economical Accuracy (Indicated by Tolerance Class) | Surface Roughness ValueRa (μm) | Scope of Application |
| 1 | Rough car | IT11~13 | 12.5~50 | End face |
| 2 | Rough turning and half fine turning | IT8~10 | 3.2~6.3 | |
| 3 | Rough turning, half fine turning, one fine turning | IT7~8 | 0.8~1.6 | |
| 4 | Rough turning, half fine turning, one grinding | IT6~8 | 0.2~0.8 | |
| 5 | Rough planing (or rough milling) | IT11~13 | 6.3~25 | Generally unhardened plane (end milling surface roughness Ra smaller value) |
| 6 | Rough Planing (or Rough Milling - Fine Planing (or Fine Milling) | IT8-10 | 1.6~6.3 | |
| 7 | Rough planing (or rough milling - fine planing (or fine milling - scraping | IT6~7 | 0.1~0.8 | When the batch of unhardened planes with high precision requirements is large, the wide-blade precision planing scheme should be adopted. |
| 8 | Replace the above scraping with a wide-blade fine planer | IT7 | 0.2~0.8 | |
| 9 | Rough planing (or rough milling) - fine planing (or fine gun) - grinding | IT7 | 0.2~0.8 | Hardened or unhardened flats with high precision requirements |
| 10 | Rough planing (or rough shot) - fine planing (or fine milling) - grinding | IT6~7 | 0.025~0.4 | |
| 11 | Rough milling and pulling | IT7~9 | 0.2~0.8 | Mass production, smaller plane (accuracy depends on broach accuracy) |
| 12 | Rough milling-finishing-grinding-grinding | IT5above | 0.006~0.1(orRz0.05) | High precision plane |
| Hole Machining Plan | ||||
| No. | Processing methods | Economical Accuracy (Indicated by Tolerance Class) | Surface Roughness ValueRa(μm) | Scope of Application |
| 1 | Drill | IT11-13 | 12.5 | Machining solid blanks of unquenched steel and cast iron, also can be used for machining non-ferrous metals, the hole diameter is smaller than20mm |
| 2 | Drill a ream | IT8~10 | 1.6 ~ 6.3 | |
| 3 | Drill a rough ream | IT7~8 | 0.8 ~ 1.6 | |
| 4 | Drill and expand | IT10~11 | 6.3 ~ 12.5 | Machining solid blanks of unquenched steel and cast iron, also can be used for machining non-ferrous metals, the hole diameter is larger than15mm |
| 5 | Drill, expand, ream | IT8~9 | 1.6 ~ 3.2 | |
| 6 | Drill-expand-rough-ream-fine-ream | IT7 | 0.8 ~ 1.6 | |
| 7 | Drill, expand, machine hinge, and hand hinge | IT6~7 | 0.2 ~ 0.4 | |
| 8 | Drill, expand, pull | IT7~9 | 0.1~1.6 | Mass production (accuracy depends on the accuracy of the broach) |
| 9 | Rough boring (or reaming) | IT11~13 | 6.3 ~ 12.5 | Various materials except hardened steel, blanks with cast or forged holes |
| 10 | Rough boring (rough expansion) half fine boring (fine expansion) | IT9~10 | 1.6 ~ 3.2 | |
| 11 | Rough boring (rough expansion), half fine boring (fine boring)Expansion) a fine boring (reaming) | IT7~8 | 0.8 ~ 1.6 | |
| 12 | Rough boring (rough expansion), half fine boring (fine boring)Expansion) one fine boring one floating boring cutter fine boring | IT6~7 | 0.4 ~ 0.8 | |
| 13 | Rough boring (expansion) half fine boring and one grinding hole | IT7~8 | 0.2 ~ 0.8 | Mainly used for hardened steel, can also be used for unquenched steel, but not suitable for non-ferrous metals |
| 14 | Rough boring (expansion) half fine boring, rough grinding and fine grinding | IT7~8 | 0.1 ~ 0.2 | |
| 15 | Rough boring, half fine boring, fine boring, fine hammer, fine boring (diamond boring) | IT6~7 | 0.05~0.4 | Mainly used for non-ferrous metals with high precision requirements |
| 16 | Drill one (expand) one rough hinge one fine hinge oneHoning; drilling one (expanding) one pulling one honing;Rough boring, half fine boring, fine boring and honing | IT6~7 | 0.025 ~ 0.2 | Holes with high precision requirements |
| 17 | Replacing honing in the above method with grinding | IT5~6 | 0.006-0.1 | |
| Positional Accuracy of Axis-Parallel Holes (Economic Accuracy) | |||||
| Processing Methods | Tool Positioning | The Distance Error between the two Hole Axes or the Distance Error from the Hole Axis to the Plane | Processing Methods | Tool Positioning | The Distance Error between the two Hole Axes or the Distance Error from the Hole Axis to the Plane |
| Drilling on vertical or radial drills | Use a drill | 0.1 ~ 0.2 | Boring on a horizontal boring machine | With boring die | 0.05 ~ 0.08 |
| Underline | 1.0 ~ 3.0 | By positioning template | 0.08 ~ 0.2 | ||
| Vertical drill or shakeArm drill upper boring | With boring die | 0.03 ~ 0.05 | Read as directed by the locator | 0.04-0.06 | |
| Boring on a lathe | underline | 1.0 ~ 2.0 | Block gauge | 0.05 ~ 0.1 | |
| Use a square with a slide | 0.1 ~ 0.3 | Use a bore gauge or feeler gauge | 0.05 ~ 0.25 | ||
| Coordinate boring machineupper boring | With optical instruments | 0.004-0.015 | Coordinate device with degree control | 0.04-0.05 | |
| Diamond boring machineupper boring | 0.008~0.02 | With a vernier | 0.2 ~ 0.4 | ||
| Boring on multi-axis machine tools | With boring die | 0.03-0.05 | Underline | 0.4 ~ 0.6 | |


You may also like
Send inquiry
Send now


